Reporting Reassignments
Note: ARIN retired its original email template processor on 3 June 2024. If you are an ARIN customer who relied on templates to manage your registration records, we encourage you to use our Reg-RWS service. You may also utilize our open-source template processor.
The Big Picture
Before using or designing software to manage records within ARIN’s database, it is important to understand ARIN’s relational database, and how ARIN maintains records and interacts with customers.
IP Address and Autonomous System Number (ASN) Distribution
ARIN is one of five Regional Internet Registries (RIRs). RIRs are nonprofit corporations that administer and issue IP address space and ASNs within defined regions. RIRs receive address space in large blocks from the Internet Assigned Numbers Authority (IANA), and allocate smaller address blocks to organizations within their regions. These organizations then assign IP addresses to consumers.
Direct Allocation Flow
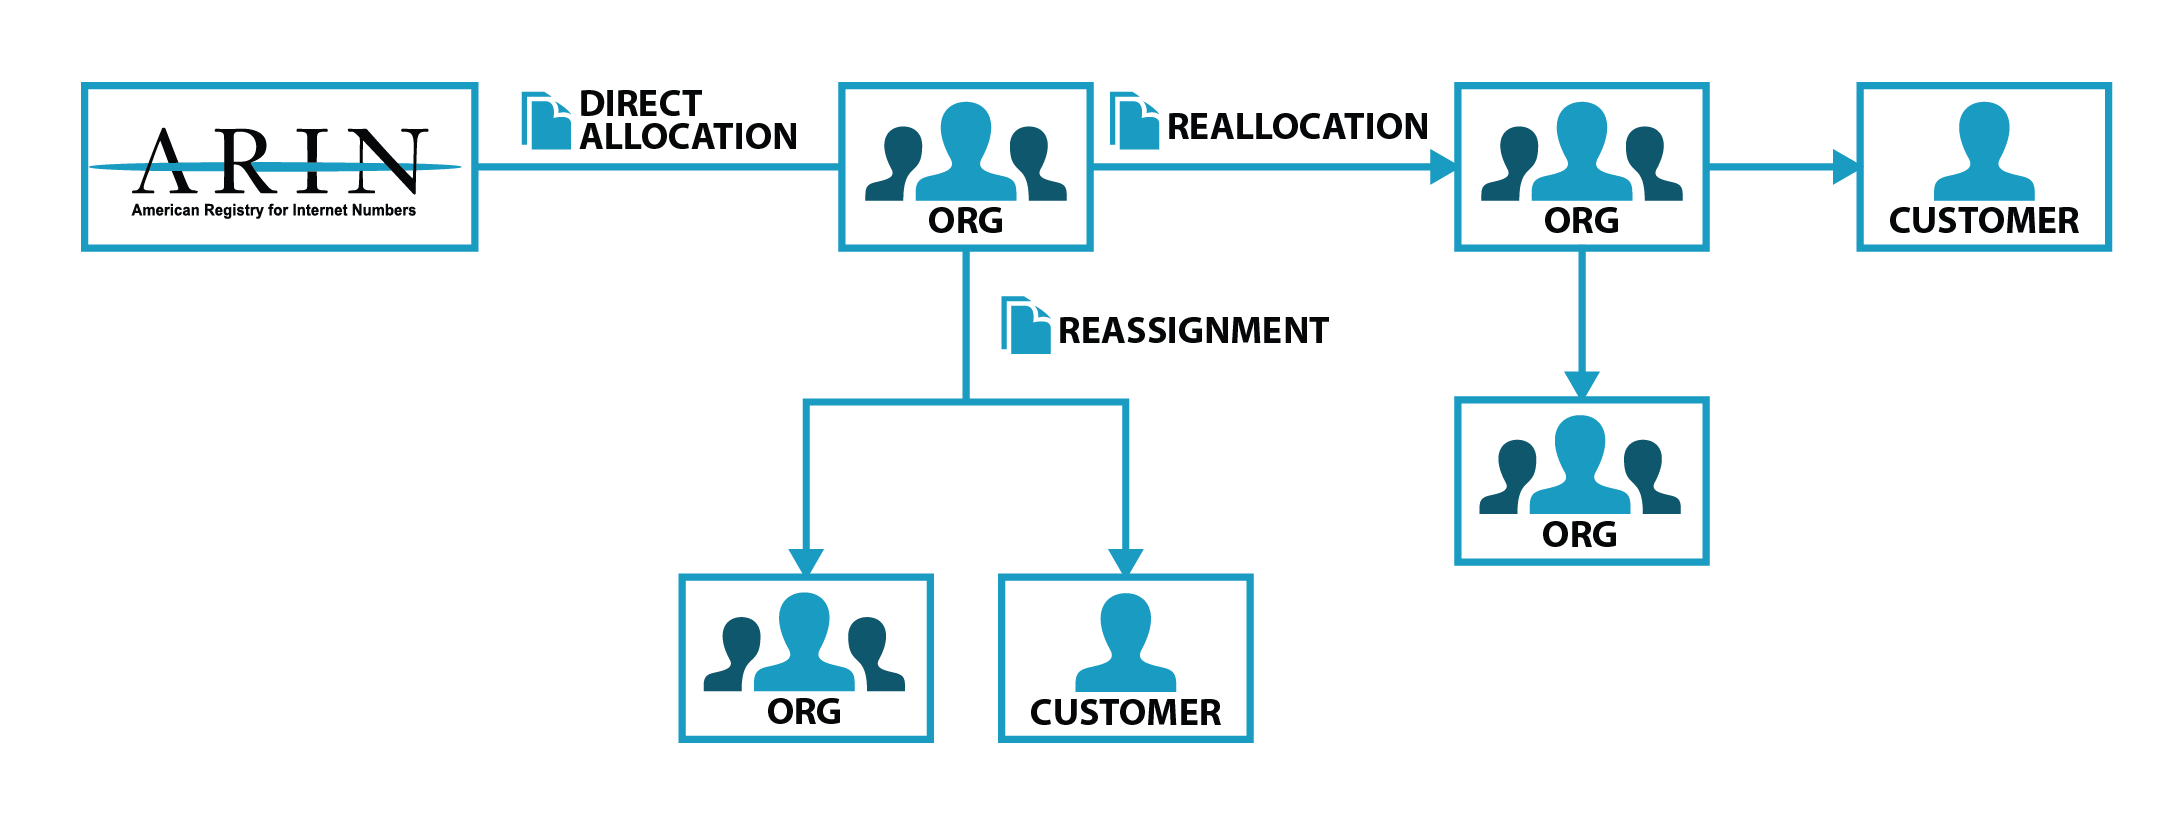
- When ARIN issues a block of IP addresses to a customer planning to issue pieces of that block to its own customers, this is known as an direct allocation or allocation.
When an ARIN customer issues a piece of their allocation to a customer of their own, this is known as a reallocation or reassignment, depending on whether their customer intends to issue pieces of that block to customers of their own (reallocation) or if it is intended for internal use (reassignment).
Note: Reallocations and reassignments may only be made from an allocation.
Autonomous System Numbers (ASNs)
ASNs are assigned individually by ARIN and may not be allocated.
Simple vs. Detailed Reassignments
Simple reassignments are those where the customer does not need to maintain their own in-addr.arpa delegation (reverse name server), display their own Point of Contact information, or divide their address space further among their own customers. A detailed reassignment is one in which the customer does not need to further divide the address space but does need to maintain its own in-addr.arpa delegation and/or display separate Point of Contact information.
Need more help understanding the difference between detailed reassignments and simple reassignments? Read our “Understanding Customer Delegation Actions in the ARIN Registry” post on the ARIN Blog.
Resource Requests
In order for ARIN to properly issue Internet number resources to organizations within its region, those organizations submit a resource request, stating which type of resources they need, and how they intend to use them. ARIN requires that requests include utilization plans, so that ARIN can allocate them fairly among organizations as they continue to expand their networks and customer bases.
Keeping Track of Who Uses What
ARIN maintains a database that contains detailed records of which resources have been allocated and assigned, as well as which organizations and Points of Contact are authoritative over those resource records.
Before You Get Started
Requirements
When an organization reallocates or reassigns address space, they report reallocation/reassignment information to ARIN. This information is vital, as ARIN makes allocations based on an organization’s utilization history, projected requirements, and other information. While initial allocations may be relatively small, subsequent allocation sizes are scaled based partially on growth shown via reallocation/reassignment information received by ARIN.
ARIN policy requires organizations to submit information for all IPv4 reassignments/reallocations of /29 or more and IPv6 reassignments/reallocations of /47 or more within seven days of the subdelegation. For IPv4 blocks of /30 or less, ISPs may choose to provide utilization data using one of the methods described on this page or manually upon request. There are special reporting requirements for residential cable ISPs and residential customers. Organizations may only submit reassignment data for records within their allocated blocks. ARIN may request reassignment/reallocation information at any time. If the organization does not supply the information, ARIN may withhold future allocations, and in extreme cases, existing allocations may be affected.
Note: Organization Identifiers (Org IDs) containing a -Z are not eligible to receive reallocations/reassignments.
Create an ARIN Online Account
Your first step is to create an ARIN Online account, regardless of the reporting method you intend to use.
Create an API Key
After creating your account and logging in to ARIN Online, you need to create an API key to be able to report reassignment/reallocation information using Registration Restful Service (Reg-RWS). An API key provides a means of secure communication with ARIN.
Create a Point of Contact and Give it Authority
Before reporting reallocation/reassignment data, your ARIN Online account must have the authority to do so. ARIN’s Reg-RWS will not process any modifications to a database record unless you have an ARIN Online account linked to a Point of Contact with proper authority over that record. Visit Creating a Points of Contact for more information.
After you create or find the correct Points of Contact in ARIN’s database, that Point of Contact must be linked to your ARIN Online account. Visit Linking a Point of Contact to Your ARIN Online Account for more information.
Finally, you will need to create or find the appropriate Organization Identifier (Org ID) to add your Point of Contact to it as an Admin and/or Tech Point of Contact. This allows your Point of Contact (and your ARIN Online account) to make changes to ARIN’s database regarding your Org ID and any resources attached to it. Visit Creating an Org ID for more information.
Methods
ARIN Customers have three options when it comes to reporting their reallocation/reassignment data: Reg-RWS, Referral Whois (RWhois), and ARIN Online.
Reporting Reallocation/Reassignment Data using Reg-RWS
Reg-RWS is a secure and efficient method for interacting with ARIN’s database and managing your registration records. Reg-RWS is most handy for repetitive, mundane tasks done in high volume with no needed human communication, such as reporting reassignments using the Shared Whois Project (SWIP). Generally, most users of ARIN’s Reg-RWS are engineers who code software that works with the Reg-RWS API to automate large numbers of transactions with the ARIN database. Although Reg-RWS commands can be entered individually into a browser, most users who want to run simple queries or report a few transactions use easier methods such as ARIN Online to do so. More information about this method is available on the Automating Record Management with Reg-RWS page.
Reporting Reallocation/Reassignment Data using RWhois
RWhois is an extension of the original Whois protocol and service. It focuses on the distribution of data representing networks and Points of Contact, and uses the inherently hierarchical nature of these network objects (domain names, IP networks, email addresses) to more accurately discover the requested information. RWhois allows organizations to advertise their reallocation/reassignment from an internal server, rather than actively sending it to ARIN. There are numerous requirements for using this sort of distribution server for reallocation/reassignment information, including 24/7 server functionality, response qualification, and continuity of data. For details, see Section 3.2 of ARIN’s Number Resource Policy Manual (NRPM). More information about this method is available on the Referral Whois (RWhois) page.
Reporting Reallocation/Reassignment Data using ARIN Online.
Creating Reassignments
To reassign network address space, you have the following options:
Option 1: View free blocks and reassign:
- In ARIN Online, choose IP Addresses > Reassign Addresses from the navigation menu. A list of unassigned address space is displayed. (Note that users with over 11,000 NETS will not see this list. See the note at the end of this section.)
- In the list of networks, choose the network space that you want to reassign.
- Choose the size of the CIDR block to reassign, then choose Reassign.
Option 2: View networks and enter a range to reassign:
- From the Dashboard, under Account Snapshot, choose Networks (NETs) to access the Manage Your Networks page. A list of NETS associated with your account is displayed. (Note that users with over 11,000 NETS will not see a list of associated NETS. See the note at the end of this section.)
- In the list of networks, expand the informational panel for the network portion that you want to reassign by selecting the plus sign located to the right of the Org ID. The actions available to you (depending on permissions and resources) appear under NET Actions.
Tip: Copy the Network Range so that you can easily enter it later in the Reassignment Details screen.
Note for Users With 11,000 or More Associated NETS:
- Choosing IP Addresses > Reassign Addresses will not provide the list of free blocks. You’ll need to enter the IP address in the IP Address Range field in the Reassignment Details page and follow the instructions in the subsequent screens.
- Choosing IP Addresses > Search will not display a list of NETS associated with you. You’ll need to enter an IP address in its entirety and choose Search to display it.
Deleting Reassignments
First, find the network that was reassigned by selecting IP Addresses > Manage Networks from the navigation menu. Search for the reassignment to be deleted. Be sure that you have selected the option to “Include the ### networks you’ve reassigned in your search.”
To delete a reassigned/reallocated NET:
- In the list of search results, expand the informational panel for the NET by selecting the plus sign located to the right of the Org ID.
- Under NET Actions , choose Delete to open the Delete Network page. The page provides information about the reassigned/reallocated space and any additional reassignments contained that were made under the reallocation.
- Choose Delete to remove the NET. Any additional reassignments that were made after the initial reallocation are also removed.
Caution: You can’t undo this deletion.
To remove individual reassignments from a list of reassignments of a space:
- In the list of search results, click the Net Handle to open the Manage Network page for that NET.
- From the Actions button, choose Delete Reassignments. A list of the reassignments is displayed.
- On the Delete Reassignments page, choose an individual network by clicking on the Net Handle.
- On the Manage Network page, choose Delete.
Caution: You can’t undo this deletion.
To delete all reassignments under a network:
- In the list of search results, click the Net Handle to open the Manage Network page for that NET.
- From the Actions button, choose Delete Reassignments. A list of the reassignments is displayed.
- Choose Delete All Reassignments.
- Confirm the deletion.
Caution: You can’t undo this deletion.
Making Changes to Simple Reassigned Orgs Using ARIN Online
To make changes to simple reassigned Orgs, you have the following options:
- Choose IP Addresses, then Manage Networks from the navigation menu. This page will allow you to search your associated networks.
- In the search field, enter the network that you want to make changes to.
- Check the box ‘Include the ### networks you’ve reassigned in your search’ option and select Search.
- In the search results, select the Net Handle for the network.
- In the Network Information panel select Actions, then Modify will present you with the options to modify your network record; Or, in the Network Information panel, under Actions menu, Modify Customer will present you with the options to modify your customer record.
Note: Updating this information keeps the registered date for the Org unchanged.
Reporting Reassignments
- Referral Whois (RWhois)
- Requesting Removal of Stale Reassignment and Reallocation Records
- Open-source Template Processor (TP)
- Detailed Reassignment and Reallocations
Related
Registration Services Help Desk
7:00 AM to 7:00 PM ET
Phone: +1.703.227.0660
Fax: +1.703.997.8844